A 10-step Guide to Excel Automation using Power Automate Desktop
Microsoft recently announced that it would be making its Power Automate Desktop solution freely available for all Windows 10 users. This could be a tipping point in its vision to democratize RPA. For those unaware, RPA is Robotic Process Automation — a technology to automate rule-based, transactional, and repetitive tasks on computers. It can broadly be classified into two categories — unattended (bots that run on server-side, pre-scheduled, or triggered by a logical flow) and attended (bots that run on user desktops, triggered manually).
Power Automate Desktop solution by Microsoft is an attended RPA offering. It combines the capabilities of Microsoft Flow, which was developed in-house, and Softomotive’s WinAutomation, the start-up Microsoft acquired in May 2020 to augment its RPA capabilities. To download the Power Automate Desktop solution, simply visit this website or log in to your Office 365 account and search for Power Automate in apps. Install the application by running the executable file; you will be prompted to log in to your Office 365 account, and then you’re all set to create your first automation workflow.
In this blog, I’ll give a walkthrough on how to automate the reading of data from a set of several same structured Excel files and compile those into a separate Excel file. While this is possible through other scripting languages such as Python, it is a lot easier and intuitive to execute it through Power Automate.
Let’s get started!
Step 1 — Retrieve all the files in a folder for reading data.
Put all Excel files from which you want to read data in a separate folder and let us name it — Excel Read. Power Automate provides a list of pre-built actions, as we can see in the left column of Figure 1.
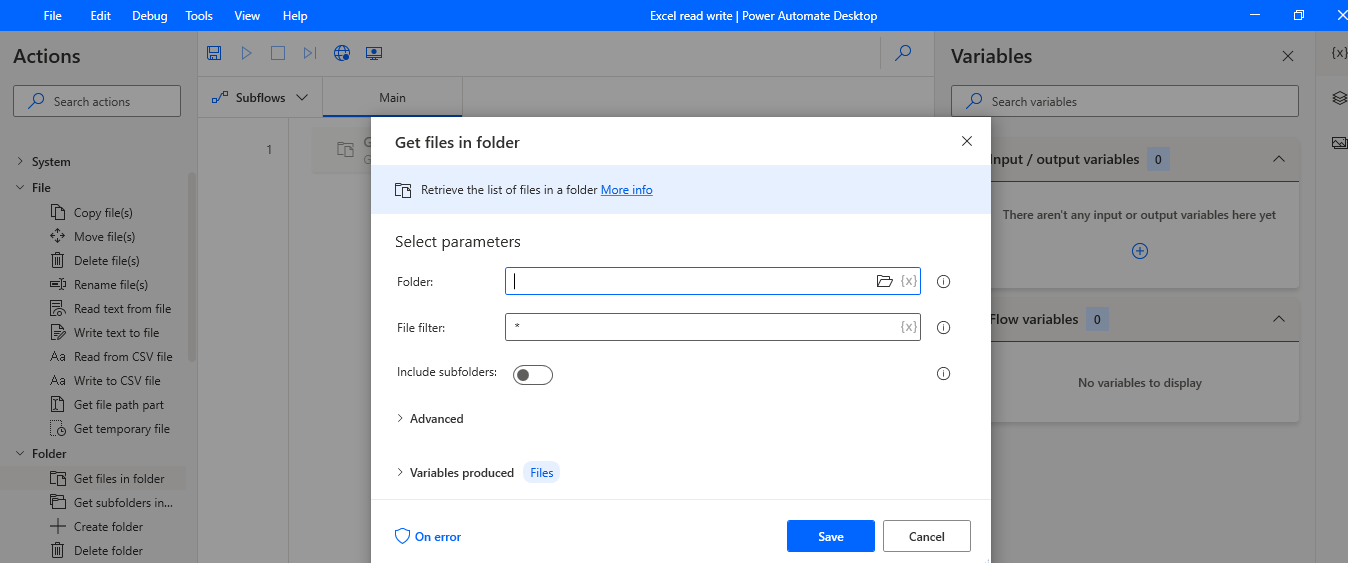
Drag and drop the “Get files in folder” action item which can be found under the Folder section of Actions, into the Main window. This will display a pop-up as shown in Figure 1. Provide the location of the “Excel Read” folder (the one which had all the Excel files to read data, refer to Step 1) in the Folder parameter of the pop-up. This produces a variable — Files, as we can see towards the bottom left corner of the pop-up in the above image.
Step 2 — Launch the Excel file where you’d want to write the data.
Excel is a pre-built action item under the Actions. Drag and drop the “Launch Excel” action item. It allows us to launch either a blank document or an existing Excel file. Note that this instance of Excel is stored in a variable ExcelInstance by default. We can also edit the variable name by clicking on it.
Step 3 — Set a variable to traverse the row/column.
Refer to the Variables folder under the Actions. Drag and drop the “Set variable” option to initialize a variable. We are doing this to traverse the Excel sheet for reading data. We will initialize the variable to a numeric value, the row/column number from which we want to begin traversing.
Step 4 — Loop through the files in the folder.
Launch the “For each” action item under the “Loops” folder. Set the value to iterate as the name of the variable where we had retrieved and stored all the files. In this case, it is — %Files%. Do not remove the % sign from the variable.
Step 5 — Rename the current file.
It is essential to rename the CurrentFile i.e., the file which is presently being processed as we need to provide the path of the file for reading data in Step 6. Another point to be kept in mind is switching on the keep extension toggle switch and updating the if file exists condition to — overwrite.

This means that we would loop through the list of files and overwrite the existing data in the renamed file. Note that while renaming, choose a file name that does not already exist in the folder. In this case, we rename it to Extract. “Rename file” action item can be found under Files in Actions.
Step 6 — Launch Excel to read data.
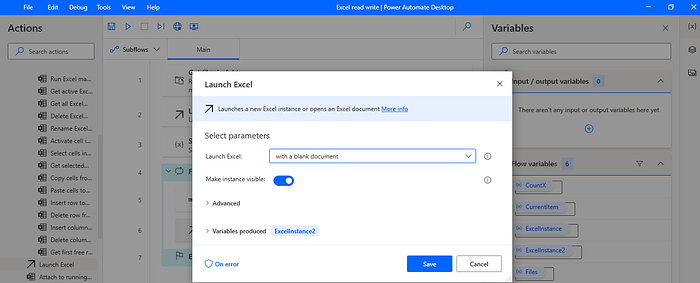
Use the Launch Excel pre-built action under Excel and provide the path to the renamed file, which is Extract.xlsx as per the above step. Note that the variable produced in this step would be ExcelInstance2 by default, as Launch Excel in Step 2 had produced the variable ExcelInstance. Refer to Figure 3.
Step 7 — Set a variable to traverse the row/column.
Depending on whether you are traversing row-wise or column-wise, initialize the second variable here. If you are traversing each row first, then the column variable should be initialized here and the row variable in Step 3. Action item used, same as Step 3 — “Set variable”. For the ones familiar with traditional coding techniques, this is the same as traversing an NxM matrix using two For loops in O(n²).
Step 8 — Set active Excel worksheet (In case there are multiple sheets in the Excel workbook).
If the Excel workbook from which you are reading consists of multiple excel sheets, you can use the “Set active Excel worksheet” pre-built action under the Excel Actions list, as shown towards the left column in Figure 3. This would activate the named sheet and perform reading actions on that particular sheet.
Step 9 — Copy/Paste the cell values.
In this step, we copy and paste data from source to destination sheets. Action items used — “Copy cells from Excel worksheet” and “Paste cells to Excel worksheet”. Both can be found under the Advanced folder in Excel Actions. The pop-up for copy and paste actions requests for respective Excel Instances. Excel instance variable is generated whenever we launch an Excel sheet (Refer to figure 3, bottom left corner of the pop-up). As shown in Figure 3, ExcelInstance2 is the instance generated for reading the data and ExcelInstance was the variable generated for writing the data.
Increment the variable for row/column using the “Increase variable” action item under Variables.
Step 10 — Close Excel.
Exit the loops and Close the Excel sheet with instance ExcelInstance2, the one from which we were reading the data. Use the action item “Close Excel” under the Excel folder. This is essential for overwriting and renaming the file. And finally, increment the row/column on which we want the data from the next workbook to be written on.
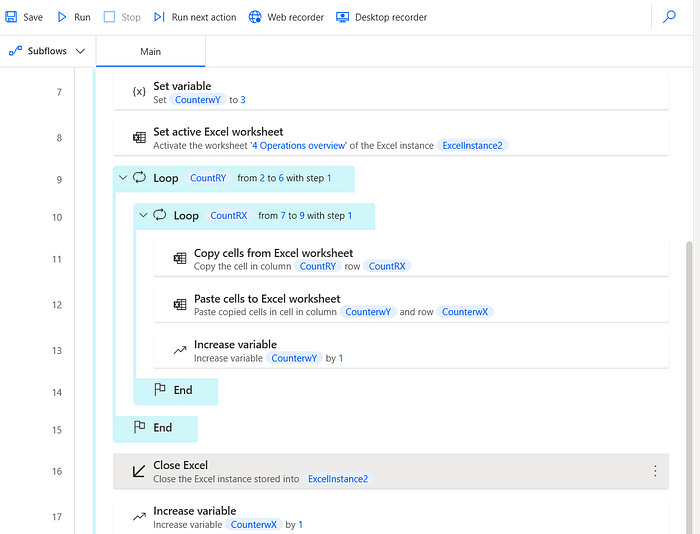
Following the above 10 steps, we should end up with a workflow similar to the one shown in Figure 4. Click on the Run button next and let the magic unfold!
This is just one of the basic functionalities of the Power Automate and RPA tool. We can automate several other repetitive, transactional tasks such as sending bulk emails, extracting data from the web, and also perform OCR on PDFs and other documents for editing.
Hope you found this helpful, now go ahead and install Power Automate and explore and share new possibilities with RPA!